



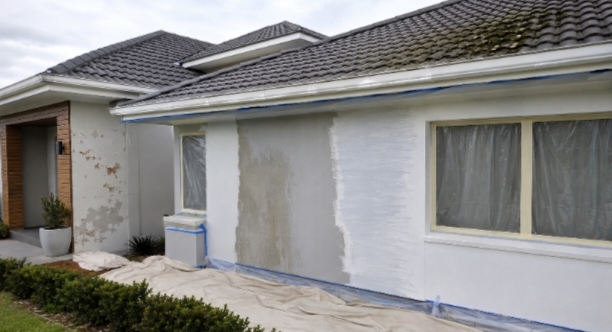
Roof and exterior coatings often fail because application begins before the substrate is clean, dry, stable, and compatible with the selected system. A serious painting assessment must examine moisture, existing coatings, surface damage, weather exposure and application requirements before opening any container. Drawing on years of practical exterior work, this guide explains the mistakes that cause peeling, blistering, patchy colour and weak adhesion, while showing how disciplined preparation and controlled application produce a more consistent result.
Common Roof and Exterior Painting Mistakes to Avoid
The most serious common roof and exterior painting mistakes to avoid involve preparation, moisture, coating compatibility, and weather timing. These errors weaken adhesion before the finish has time to perform. Correcting them requires a complete system rather than another surface coat.
A roof and exterior wall experience different movement, heat, water flow, and contamination. Each substrate needs a specific inspection and preparation method. Treating every surface alike creates avoidable weaknesses around joints, edges, and existing repairs.
Painting Mistake and Correction Table
| Painting mistake | Likely result | Correct approach |
| Painting over dirt | Weak adhesion and early peeling | Wash, rinse and dry fully |
| Coating active mould | Staining and recurring growth | Treat the source and affected surface |
| Leaving loose paint | New coating detaches with old layers | Scrape and sand unstable edges |
| Painting damp surfaces | Blistering and trapped moisture | Confirm the substrate is dry |
| Using the wrong primer | Patchy adhesion and staining | Match primer to substrate |
| Painting in poor weather | Uneven drying and surface defects | Follow suitable conditions |
| Applying heavy coats | Sagging and slow curing | Apply specified coat thickness |
| Overworking drying paint | Lap marks and texture variation | Maintain a wet working edge |
| Ignoring roof defects | Coating conceals unresolved damage | Repair defects before coating |
| Poor masking | Overspray and untidy junctions | Protect every adjoining surface |
Painting Before Inspecting the Substrate
A coating cannot correct loose render, broken tiles or decayed timber. It follows the movement and condition of the surface beneath it. Inspection must therefore happen before cleaning, filling or colour selection begins.
Step 1: Identify Every Surface
Separate roof tiles, metal sheets, render, masonry, timber and gutters. Record old coatings, repairs and exposed materials. Each surface may need different cleaning, primer and application methods.
Do not assume the existing coating remains suitable because it looks intact from the ground. Test questionable areas for adhesion and inspect edges where peeling normally begins. Examine shaded and weather-facing elevations separately.
Step 2: Find Existing Defects
Look for cracked tiles, loose ridge elements and corroded roof sheets. Check walls for hollow render, open joints and failed sealant. Repairing these defects after painting damages the new finish.
Where roof condition is uncertain, professional roof painters can assess coating preparation within the wider roof-painting scope. Structural roofing defects may still need another appropriate trade. Keep substrate repairs separate from cosmetic coating work.
Step 3: Record Previous Repairs
Different repair materials can absorb coatings unevenly. Fresh filler, old render and bare masonry may produce visible patches without suitable priming. Mark every repaired area before the main coating begins.
Check whether previous patching remains securely bonded. Remove loose or powdery material rather than sealing over it. Feather repaired edges so they do not show through the finished surface.
Leaving Contamination Beneath New Paint
Exterior surfaces collect dust, salts, exhaust residue, chalking and biological growth. Paint applied over these materials bonds to contamination instead of the substrate. Careful cleaning creates the stable surface needed for reliable adhesion.
Step 1: Remove Loose Material
Brush away debris before wet cleaning begins. Scrape flaking paint and remove unstable coating edges. Sand glossy or rough sections where the selected system requires it.
Roof valleys, tile overlaps and wall ledges collect more debris than open surfaces. Clean those areas without forcing water into the building. Protect drainage points from dislodged material.
Step 2: Wash Methodically
Use a cleaning method suitable for the substrate. Excessive pressure can damage render, drive water beneath tiles or cut into soft timber. Gentle methods may require more time but protect fragile surfaces.
Work in manageable sections from the correct direction. Rinse away cleaning residue completely. Allow hidden joints and porous materials enough time to dry.
Step 3: Treat Biological Growth Properly
Mould, algae and lichen should not be hidden beneath coating. Remove growth using a suitable treatment and controlled cleaning process. Investigate recurring moisture or shade conditions as part of the preparation.
Do not paint while treated material remains wet or loose. Confirm that residue has been rinsed where required. Reinspect textured surfaces because growth can remain inside small recesses.
Trapping Moisture Beneath the Coating
Moisture beneath paint can weaken adhesion and create blisters or stains. Exterior walls may look dry while retaining water within porous materials. Roof joints and shaded elevations often need additional drying time.
Step 1: Locate Moisture Sources
Inspect leaking gutters, failed sealants and roof-to-wall junctions. Look for stains beneath eaves and around window openings. Painting should pause until active water entry is corrected.
Ground-level walls can also receive splashback or rising moisture. A coating cannot stop every moisture path from the exposed face. Identify whether the source comes from above, behind or below.
Step 2: Respect Porous Surfaces
Render, masonry and concrete can hold water after washing. Drying time changes with shade, humidity, temperature and surface thickness. A surface feeling dry does not always mean deeper moisture has cleared.
Use appropriate testing when conditions remain uncertain. Pay special attention to recently repaired render and filler. These areas can dry differently from the surrounding wall.
Step 3: Avoid Sealing Active Damage
Blistered paint should be opened and investigated. Recoating a blister hides the symptom without correcting the cause. Remove failed layers back to a stable boundary.
An organised exterior house painting process should place moisture correction before priming and finishing. This sequence protects the new coating from the same failure. It also prevents repeated patching after the main work is complete.
Using Incompatible Primers and Coatings
Exterior materials do not accept every primer or finish equally. Bare metal, masonry, timber and roof tiles have different adhesion and protection needs. Product compatibility must be confirmed across the complete coating system.
Step 1: Match Primer to Substrate
Bare timber may need a primer that controls absorption and supports the topcoat. Metal can require corrosion treatment and a compatible primer. Masonry may need sealing where porosity or alkalinity affects the finish.
Do not use one leftover primer across unrelated surfaces. Check the substrate, existing coating and final product together. Follow the specified drying and recoating intervals.
Step 2: Test Existing Coatings
An old glossy coating can resist adhesion. Powdery paint can detach beneath a new layer. Unknown coatings require testing before large-scale application.
Prepare a small trial area when compatibility remains uncertain. Allow it to dry and examine adhesion, colour and surface reaction. Continue only when the system behaves correctly.
Step 3: Keep the System Consistent
Mixing unrelated primers and topcoats can create drying or adhesion problems. Use products intended to operate together. Record each product and application area for later maintenance.
Do not assume a self-priming coating removes every preparation requirement. Bare patches, stains and special substrates may still need targeted treatment. Read the technical requirements for the actual surface condition.
Painting in Unstable Weather Conditions
Exterior painting depends on temperature, moisture, wind and sunlight. Conditions can change faster on a roof than at ground level. Starting at the wrong time can create uneven drying and visible defects.
Step 1: Check the Full Work Window
Review conditions for application and drying. A clear morning does not help if rain arrives before the coating stabilises. Plan each section around a realistic completion window.
High humidity can extend drying. Strong wind can carry overspray and dry exposed edges too quickly. Direct sunlight can heat dark surfaces beyond suitable application conditions.
Step 2: Measure the Surface Condition
Air temperature alone does not describe roof or wall temperature. Dark tiles and metal sheets can become much hotter than the surrounding air. Shaded walls can remain cool and damp at the same time.
Touch is not a precise measurement. Use suitable equipment where temperature is critical. Delay work when the surface falls outside the coating requirements.
Step 3: Follow the Building Orientation
Plan work around sun movement and shade. Complete connected sections before changing conditions affect the wet edge. Avoid chasing rapidly drying paint across a large wall.
Windward elevations may receive greater contamination and weather exposure. Leeward areas may retain dampness longer. Adjust preparation and scheduling for each elevation.
Applying Coats Too Thickly or Thinly
Correct film build supports coverage, drying and protection. Heavy coats can sag or cure slowly, while thin coats leave weak areas. Consistent application matters more than finishing the project quickly.
Step 1: Prepare the Coating Correctly
Mix the coating until colour and solids are evenly distributed. Avoid unapproved thinning because it changes coverage and film formation. Keep containers protected from contamination during work.
Combine matching containers where colour consistency requires it. Stir during longer application periods. Do not return contaminated coating to the main container.
Step 2: Use the Correct Applicator
Smooth surfaces and textured render require different roller covers. Brushes provide control around edges, while spraying requires disciplined distance and overlap. One tool cannot deliver equal results on every detail.
Select equipment that reaches into the surface profile. Inspect coverage from several angles. Porous recesses can remain thin even when raised areas appear complete.
Step 3: Respect Recoat Intervals
A second coat applied too early can disturb the first. Waiting too long can also create preparation requirements between coats. Follow the stated interval under the actual conditions.
Do not judge readiness by appearance alone. Cooler or humid areas may remain soft after sunlit sections have dried. Test the slowest-drying section before continuing.
Creating Lap Marks Across Large Walls
Lap marks form when one section dries before the next section connects. Large rendered walls and weatherboards make inconsistent working patterns easy to see. A planned sequence keeps colour and texture more uniform.
Step 1: Divide the Elevation Naturally
Use corners, downpipes and architectural breaks as stopping points. Avoid ending in the centre of an uninterrupted wall. Complete one controlled section before moving elsewhere.
Work from the top down where the method permits. This helps control drips and maintains a logical sequence. Protect completed sections from later roof or gutter work.
Step 2: Maintain a Wet Edge
Connect each fresh section while the previous edge remains workable. Keep roller pressure and direction consistent. Do not return repeatedly to paint that has started setting.
Large elevations may need enough labour to maintain continuity. Starting too wide a section causes rushed application near the end. Reduce the working width before quality begins to fall.
Step 3: Inspect Under Changing Light
Low-angle light reveals roller lines and uneven texture. Check the surface before dismantling access equipment. Correct acceptable defects within the coating’s permitted process.
Colour can appear different between sun and shade. Evaluate consistency from a normal viewing distance. Do not touch up isolated marks without checking how the patch will blend.
Masking Details Too Late or Too Loosely
Poor protection can leave overspray on windows, gutters, paths and neighbouring property. Masking must survive wind and the complete application period. Rushed protection creates cleanup that can damage finished surfaces.
Step 1: Protect Every Adjacent Surface
Cover windows, doors, lighting and external fittings. Protect decks, paving, plants and vehicles from droplets or overspray. Move removable items away from the work zone.
Roof painting requires careful protection of gutters, solar equipment and adjoining finishes. Wall painting needs clean boundaries around trims and openings. Review masking from every working position.
Step 2: Secure Masking Materials
Loose plastic can touch wet paint or tear in wind. Fix protection firmly without damaging the substrate. Use materials suitable for outdoor exposure and the selected coating.
Check masking during the workday. Sun and wind can weaken tape adhesion. Replace failed sections before application continues.
Step 3: Remove Protection at the Right Time
Leaving tape too long can tear coating edges. Removing it too early can allow wet paint to spread. Follow a controlled removal sequence.
Score delicate edges where necessary. Pull tape away carefully rather than sharply across the finish. Inspect the exposed line before moving to the next area.
Treating Roof Painting Like Wall Painting
Roofs carry different risks from vertical walls. They contain drainage paths, overlaps, penetrations and surfaces exposed to intense heat. Roof preparation and application therefore need their own controlled method.
Step 1: Inspect Water Paths
Check valleys, flashings, gutters and penetrations before coating. Remove debris that could block drainage. Do not use paint to conceal cracked or displaced components.
Water must continue moving through the roof as designed. Heavy coating around overlaps can interfere with drainage details. Apply the system according to the roof material and construction.
Step 2: Control Roof Cleaning
Pressure should remove contamination without damaging the substrate. Work from a direction that limits water entry beneath tiles or sheets. Protect gutters and stormwater points from debris.
Allow the complete roof to dry after washing. Valleys and overlaps may remain wet longer than open areas. Recheck shaded sections before priming.
Step 3: Keep Application Uniform
Maintain consistent spray distance, overlap and movement. Apply edge work without flooding joints or gutters. Inspect both sunlit and shaded slopes for coverage.
Avoid starting a large slope without enough time to complete it. Natural breaks provide cleaner stopping points. Record the products and coat sequence used on every roof section.
Skipping the Final Inspection
A finish can appear complete while thin areas, overspray or missed repairs remain. Final inspection should happen before access equipment and masking disappear. This is the last practical opportunity to correct connected defects efficiently.
Step 1: Review Every Elevation
Inspect roof slopes, walls, eaves and trims systematically. Compare colour, texture and coverage between adjoining sections. Look closely at corners, penetrations and repaired patches.
Step 2: Check Functional Details
Confirm gutters, weep holes and drainage paths remain clear. Open windows and doors to confirm coating has not sealed them shut. Remove paint from fittings where it interferes with operation.
Step 3: Document the Finish
Photograph completed roof and wall sections. Record coating products, colours and application dates. Keep remaining material identified for controlled future touch-ups.
Frequently Asked Questions
These questions address common search concerns not already covered by the main sections. They focus on sequencing, colour consistency and post-painting care. Each answer provides a direct practical response.
Should Roof Painting Happen Before Exterior Walls?
Roof work usually comes first because cleaning and application can affect lower surfaces. Complete roof preparation before applying the final wall finish. Protect finished walls if later roof access remains necessary.
Why Does Exterior Paint Look Patchy After Drying?
Patchiness can result from uneven porosity, inconsistent film thickness or different application methods. Allow the coating to dry completely before judging it. Check whether repaired areas received suitable preparation.
Can New Exterior Paint Be Washed Immediately?
Fresh coatings need time to develop their intended resistance. Early washing can mark or soften the finish. Follow the curing guidance before cleaning the surface.
Why Does the Same Colour Look Different Outside?
Sunlight, shade, sheen and surrounding materials change colour perception. Test the selected colour on more than one elevation. Review samples at different times before approving broad application.
How Should Leftover Exterior Paint Be Stored?
Seal the container and keep it in a stable, protected location. Label it with the surface, colour and application date. Do not retain material that has become contaminated or unusable.
=======================