



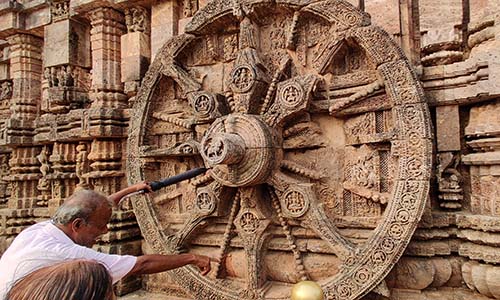
Stone carving is one of the oldest and most magnificent traditional arts in human history. For thousands of years, craftsmen have turned rough stones into vivid stone sculptures, delicate ornaments, and grand architectural decorations through patient shaping and precise carving. Unlike most creative arts that add material, stone carving is a “subtraction art” — every finished piece is the result of removing stone, layer by layer, until only the intended form remains. Making a good stone sculpture takes more than skill and patience; it takes a disciplined process, the right tools, and real respect for the material’s limits.
The full process breaks down into six stages: stone selection, design planning, rough shaping, detailed carving, surface finishing, and polishing and maintenance. Skipping or rushing any one of them shows up in the final piece.
1. Choosing the Right Stone
The stone you pick shapes everything that follows, so it’s worth spending real time on this step rather than treating it as a formality.
Marble is fine-grained and takes detail well, which is why it’s the classic choice for figures and decorative carving — think facial features, drapery folds, delicate relief work. Granite is much harder and more weather-resistant, so it’s the standard for outdoor monuments and large landscape sculpture, though its hardness makes it slower and more demanding to carve. Sandstone sits in between — workable and forgiving, but porous enough that it needs sealing if used outdoors. Limestone and soapstone (talc) are the best starting points for beginners: they cut easily with hand tools, respond well to mistakes (you can often carve around them), and don’t demand power tools to get a result.
For a first project, look for a block roughly the size of a grapefruit to a small melon — big enough to hold a real form, small enough to finish in a reasonable number of sessions. Before buying, inspect the block closely: tap it and listen for a dull or hollow sound (a sign of internal cracks), check for visible fault lines by wetting the surface, and avoid stone with sandy inclusions or uneven grain, since these are exactly where a piece will fracture under the chisel.
2. Design and Planning
Before any tool touches the stone, the work should exist on paper. Draw the front, side, and back views at the same scale, and note the overall proportions and the depth of any relief. For anything three-dimensional and more ambitious than a simple form, build a small maquette first — clay or plaster, roughly a quarter the size of the final piece — so you can check the silhouette and weight distribution from every angle before committing stone you can’t get back.
Design with the stone’s physics in mind, not just the image in your head. Thin protrusions — an outstretched arm, a raised finger, a delicate ear — are the most common failure points in stone carving, because stone has almost no tensile strength; it resists compression well but snaps easily under a sideways force. If a design calls for a slender element, plan to either keep it thick enough to survive handling or leave it attached to a supporting mass until the very last stage of finishing.
3. Rough Shaping (Roughing Out)
This is the most physically demanding stage, and the one where most of the material comes off — often 60–70% of the original block’s volume by the time it’s done. The standard tools here are a point chisel (for aggressively breaking down mass) and a pitching tool (for knocking off large corners), driven with a mallet or hammer.
The key technique to learn here is reading the stone’s grain — most stone has a natural direction it splits along most easily, and carving with that grain (rather than against it) means cleaner breaks and fewer surprise cracks. Work in from the corners and edges rather than attacking the center of a face, and always strike at roughly a 45-degree angle to the surface rather than straight down, which drives the force into the stone instead of skating off it. Step back and check the piece from all four sides every 15–20 minutes; it’s far easier to catch a proportion problem now than after the details are in.
A common beginner mistake at this stage is trying to get too close to the final form too fast. Leave 1–2 cm of extra stone as a buffer around the rough shape — this margin is what protects you from the small errors that are inevitable in the next stage.
4. Detailed Carving
With the rough form established, switch to smaller tools: a tooth chisel (for texture and transitional surfaces), a flat chisel (for clean planes), and a rasp or riffler for tight curves. This is where facial features, fabric folds, feathers, fur, or decorative patterning actually take shape.
Work from large planes down to small details, never the reverse — carving a fine detail like an eye or a fold before the surrounding mass is correctly proportioned almost always means redoing it once the larger form is corrected. Hold the chisel at a shallow, consistent angle and take light, controlled cuts rather than deep gouges; stone doesn’t forgive an overcut the way clay or wood sometimes does; once material is gone, it’s gone.
The most common failure at this stage is edge collapse — a corner or thin edge breaking away because the chisel was struck too hard or at too steep an angle. To reduce the risk, always work toward an edge rather than away from it, so any excess force glances off into open space instead of into the fragile edge itself.
5. Surface Finishing
Once the details are carved, tool marks, ridges, and rough transitions still need to be cleaned up. Craftsmen typically move through a sequence: rasps and files first to knock down high points, then coarse sandpaper (around 60–120 grit) to even out the surface.
This stage is a judgment call, not just a mechanical one. Fully smoothing every surface can flatten out the character of hand-carved work, so many carvers deliberately leave some tool marks — particularly in background or textured areas — to preserve the handmade quality and avoid the sterile look of a machine-finished piece.
6. Polishing and Maintenance
Final polishing works through progressively finer sandpaper — roughly 150, then 220, then 400, and up to 800–1500 grit for a glass-like shine on marble. Wet-sanding (keeping the surface damp) reduces dust and produces a smoother result at the higher grits. Clean off all dust and residue thoroughly before any finishing treatment.
For indoor pieces, a light coat of carving wax or mineral oil deepens the stone’s natural color and offers some protection from dust and staining. For anything that will live outdoors, use a dedicated stone sealer rated for the specific stone type — granite, marble, and sandstone all have different porosity and need different sealants — reapplied every one to two years depending on climate exposure.
Tools Checklist
- Point chisel — initial rough removal
- Pitching tool — knocking off large corners
- Tooth (claw) chisel — texturing and transitional shaping
- Flat chisel — clean planes and edges
- Rasps and rifflers — curves and fine shaping
- Mallet or carving hammer — matched in weight to the chisel size
- Sandpaper, coarse to fine (60 to 1500 grit)
- Stone sealant or carving wax, chosen for indoor vs. outdoor use
Beginners generally only need a point chisel, a flat chisel, a mallet, and a few grits of sandpaper to complete a first small piece — the rest can be added as projects get more ambitious.
Safety
Stone carving generates fine silica dust, and repeated inhalation over time is linked to silicosis, a serious and irreversible lung disease — this is not a minor precaution to skip. Always wear an N95 respirator or better (not just a cloth mask) when carving dry, and work wet-sanding where possible to keep dust down. Safety goggles protect against flying chips, which move fast enough to cause real eye injury even from small pieces. Gloves and non-slip shoes round out the basics, along with a clean, uncluttered workspace — loose stone chips underfoot are a common cause of falls.
If carving indoors or in an enclosed space, ventilate well or work near an open door; dust extraction (even a shop vacuum positioned near the work) makes a meaningful difference over long carving sessions.
Getting Started
For a first project, pick a simple, rounded form rather than anything with fine detail or thin elements — a stylized bird, a smooth abstract shape, or a simple animal form are all good starting points. Work in soapstone or a soft limestone, expect the piece to take several sessions rather than a single sitting, and don’t be discouraged if the early rough-out looks nothing like the final image in your head — that gap closes gradually, one session at a time.
From there, the fastest way to improve is repetition paired with feedback: local sculpture guilds, community studio classes, and stone-carving workshops are worth seeking out, since watching an experienced carver correct your grip or chisel angle in person will save far more time than any written guide, including this one.
Prefer a Professionally Made Stone Sculpture?
Not every project needs to start with a raw block and a chisel. If you’re looking for a finished, high-quality stone sculpture — a custom portrait statue, a garden or landscape piece, a religious or commemorative work — without carving it yourself, Sculptureshome is a custom sculpture manufacturer producing hand-carved and CNC-assisted stone sculptures in marble, granite, and other materials, alongside bronze, resin, and stainless steel work, with worldwide shipping. It’s a practical option for anyone who wants the artistry of stone sculpture without the years of practice the craft demands.