

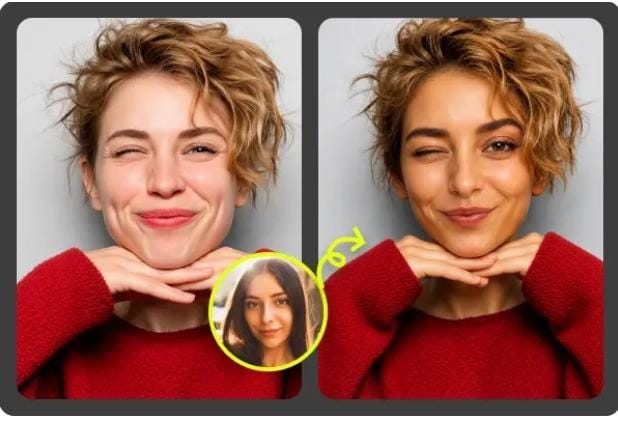
A good face swap doesn’t look like a sticker pasted on top of another photo. The skin tone feels close, the eyes sit in the right place, the light comes from the same direction, and the expression fits the body. You don’t need Photoshop to get there, but you do need to choose the right photos and make a few careful checks before you share the final image.
I’ve tested face swaps for profile mockups, birthday edits, costume ideas, and old family photo repairs. The biggest lesson is simple: the tool matters, but the source images matter more. A fast browser tool like EasyFaceSwap can do the heavy lifting, yet the most realistic results still come from photos that already match in angle, lighting, and mood.
This guide walks you through the full process, from picking images to fixing the small details that make a swap look believable. You won’t need Photoshop, layers, masks, or any design background. You’ll just need two clear photos, a few minutes, and a careful eye.
Choose Photos That Already Belong Together
Start with the target photo, which is the image that will receive the new face. This could be a group photo, a costume shot, a headshot, or a movie style portrait. Then choose the source photo, which is the face you want to place into the target image. The closer these two images match, the less work the tool has to do and the more natural the final result will look.
Face angle is the first thing I check. If the person in the target photo is looking slightly left, your source face should also look slightly left. A straight face placed onto a turned head often looks flat, even if the eyes and mouth line up. Small differences are fine, but large differences in head position usually create strange jawlines, stretched cheeks, or eyes that don’t sit naturally.
Lighting comes next. If the target photo has light hitting the left side of the face, the source face should have similar light. When one image is lit from above and the other from the side, the swap can look fake because the shadows disagree. Your brain notices those shadow problems fast, even if you can’t name what’s wrong at first glance.
Resolution also matters. A blurry source face on a sharp target photo will stand out right away. A sharp face on a grainy old photo can also look wrong unless the tool blends texture well. Try to use a source image where the face is clear, not hidden behind hair, sunglasses, hands, or heavy filters.
| Photo factor | Best choice | Why it helps |
|---|---|---|
| Angle | Similar head turn | Keeps eyes, nose, and jaw aligned |
| Lighting | Same light direction | Makes shadows look natural |
| Expression | Similar mood | Prevents an awkward mismatch |
| Quality | Clear face detail | Helps the swap avoid blur or warping |
Expression is the part people forget. A huge grin swapped onto a calm pose can look odd, even if the face is technically aligned. Match a smile with a smile, a serious face with a serious pose, and a raised chin with a raised chin. When the facial muscles match the body language, the edit feels more real.
Make the Face Swap in Your Browser
Once you have your two photos, open the face swap tool. I like using a browser based option because it saves time and removes the need to install heavy editing software. If you want the direct tool, use Photo Face Swap and upload your target photo first, then upload the source face you want to use.
Give the tool a moment to detect the face and process the swap. In most cases, you’ll get a result in less than a minute, though larger images can take longer. Don’t judge the edit too quickly while it’s still loading or previewing at a small size. Download or open the result large enough that you can inspect the eyes, mouth, hairline, ears, and neck.
The first version might already look good, but don’t stop there if you want realism. I usually create two or three versions using slightly different source photos. A photo that looks perfect in my head sometimes performs worse than a more ordinary image with better lighting. The best face swap is often the one that uses the cleanest match, not the prettiest source selfie.
Look closely at the face edges. The cheeks should blend into the ears and hairline without a hard border. The forehead should not look too smooth compared with the rest of the photo. The mouth should follow the pose, especially if teeth are visible. If any of those areas look strange, the source image may not be a good match, and it’s faster to try another photo than to fight the result.
Blend the Result So It Looks Real
After the swap, your job is to review the image like a photo editor, not just a viewer. Zoom in to about 100 percent and scan the face from top to bottom. Start at the hairline, then move to the eyes, nose, mouth, jaw, and neck. Most fake looking swaps fail around the edges of the face, not in the center.
Skin tone is one of the main realism clues. A face that is warmer, cooler, brighter, or darker than the neck will look pasted on. Some face swap tools correct this on their own, but they don’t always get it right. If the face color is close but not perfect, try a different target photo with more even light or a source photo taken in similar conditions.
Pay attention to sharpness too. If the swapped face is much sharper than the rest of the image, it can look like a magazine cutout. If it’s much softer, it can look smeared. This happens a lot when people use a crisp phone selfie as the source and an older group photo as the target. In that case, a source photo with a little less sharpness may blend better.
The eyes deserve special attention because people look there first. They should point in the same direction as the head and body. If the target person is looking at the camera but the swapped eyes look slightly away, the result may feel creepy without an obvious reason. A realistic swap keeps the gaze, eyelids, and brow tension believable.
The neck and jaw are also important. A face can be aligned well, but if the jaw shape fights the target head angle, the edit may feel wrong. This is common when swapping between very different face shapes or ages. You don’t need a perfect match, but you do need a natural transition from cheek to chin to neck.
Tips and Best Practices for Better Results
The best face swaps come from small, practical choices. Use photos taken at similar distances when you can. A close selfie has different facial distortion than a portrait taken from farther away. That’s why some swaps make noses look too large or faces look too narrow. Matching camera distance helps the face keep natural proportions.
Avoid heavy beauty filters on the source face. Smooth skin, enlarged eyes, and reshaped features may look fine on social media, but they can confuse the swap and create an artificial result. Natural texture works better. Pores, smile lines, and normal shadows help the new face blend into the target photo.
If you’re working with a group photo, crop is worth considering before uploading. A crowded image with several faces may still work, but the tool needs to understand which face you want to replace. A cleaner target photo with one main face usually gives a stronger result. If the tool offers a way to choose the face, use it carefully.
Think about the final use before you make the swap. A funny edit for friends has a different quality bar than a professional mockup or a restored family image. For personal jokes, close enough may be fine. For anything public, commercial, or sensitive, you should be more careful and only use images you have the right to edit.
Consent matters. Don’t use face swapping to mislead people, impersonate someone, or create embarrassing images without permission. The same tool that makes a fun costume preview can also be misused. A realistic result carries more responsibility because viewers may believe what they see.
Common Mistakes and Final Checks
The most common mistake is using a source face from the wrong angle. People often choose their favorite selfie instead of the photo that best matches the target pose. That usually leads to twisted features or a face that seems to float above the head. If the angle is off, choose a better source image rather than hoping the tool can fix everything.
Another mistake is ignoring light direction. A face lit from the front won’t sit naturally on a body lit from the side. You may still get a clean technical swap, but the image won’t feel real. Shadows under the nose, chin, and brow should make sense with the rest of the photo.
People also miss the expression mismatch. A laughing face on a stiff body can be funny, but it rarely looks realistic. The cheeks, jaw, and eyes all change with expression, and the body should support that emotion. If the pose is quiet, use a quiet expression. If the target photo has a big smile, choose a source with a similar smile and visible teeth if needed.
Before saving your final version, step away for a minute and come back with fresh eyes. View the image small, then large. Small view helps you judge the overall feel, while the large view helps you catch edge problems. If it looks good in both views, it’s probably strong enough for casual use.
A realistic face swap without Photoshop is mostly about matching the right photos, letting the tool handle the swap, and then checking the human details that software can miss. Start with similar angle, light, expression, and quality. Make a few versions instead of trusting the first one. Then choose the result where the face doesn’t just fit the head, but also fits the moment.